

The Kurikin G2 Master is a reliable and powerful electric scooter, but like any high-performance device, proper battery care is essential. Many riders wonder if removing the battery is as simple as it looks in online videos. In reality, it can be easy if you follow the right steps and take necessary precautions. This guide will walk you through safe battery removal, common troubleshooting tips, maintenance advice, and winter storage solutions.
Why Battery Maintenance Matters
Your scooter’s battery is its heart. A well-maintained battery ensures longer rides, consistent power, and overall scooter longevity. Neglecting battery care can lead to reduced range, unexpected power loss, or even permanent damage. Seasonal changes, especially cold winters, can further impact battery performance if proper care is not taken. Understanding battery maintenance is key to keeping your Kurikin G2 Master in top condition.
Step-by-Step Guide: Removing the Kurikin G2 Master Battery
Removing the battery may look simple online, but a careful approach is essential to prevent damage. Here’s how to do it safely:
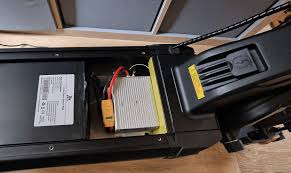
- Gather Your Tools: You will need a small screwdriver, mild threadlock sticks, silicone, and optionally an adhesive spray like Super 77 for deck areas that may loosen.
- Prepare Your Scooter: Ensure the scooter is powered off. Place it on a stable surface to prevent tipping during the process.
- Peel the Deck Carefully: Many videos make peeling the deck look effortless, but using a small screwdriver to gently work around the edges helps release the adhesive without damage.
- Disconnect the Battery: Carefully unplug any connections. Take note of where each wire goes, or take a photo to ensure correct reassembly.
- Remove Bolts: Use a mild blue threadlock stick for bolts you remove. This prevents them from loosening over time and ensures safety when reassembling.
- Handle with Care: Batteries are delicate. Avoid dropping or pressing on the battery pack.
- Reassemble Properly: Use small amounts of silicone around bolt heads and adhesive spray on deck rubber areas if needed. Test all screws and connections to make sure everything is secure.
Common Challenges and Solutions
Even though online videos make the process look simple, some riders face challenges:
- Stuck Adhesive: Use a screwdriver carefully to avoid scratching surfaces.
- Loose Bolts: Applying threadlock ensures bolts stay tight after reassembly.
- Wiring Confusion: Take photos of connections before removal for easy reference.
A proactive approach prevents mistakes and ensures your scooter functions as intended.

Battery Storage Tips for Winter
Cold temperatures can harm your battery if not stored correctly. Follow these tips for winter care:
To protect your Kurikin G2 Master battery during the winter, store it in a cool, dry place and avoid exposing it to freezing temperatures. Keep the battery at a partial charge, ideally between 50% and 70%, to preserve its health. Check it periodically and give it a light charge every few weeks to maintain performance. Additionally, avoid placing the battery near metal or other conductive surfaces to prevent short circuits. Proper winter storage like this can significantly extend battery life and help prevent unexpected failures.
Signs Your Battery Needs Replacement
Even with good maintenance, batteries degrade over time. Watch for these signs:
- Reduced Range: Noticeable decrease in ride distance per charge.
- Slow Charging: Takes significantly longer to charge than before.
- Overheating: Battery becomes hot quickly during use.
If these issues persist, it’s better to replace the battery than risk further damage to your scooter. Make sure to use manufacturer-approved or compatible replacements.
Expert Tips to Extend Battery Life
Regular inspections are essential for keeping your Kurikin G2 Master in top condition. Routinely check bolts, wiring, and connectors to ensure everything is secure and functioning properly. Cleaning battery contacts is equally important, as dust and debris can interfere with electrical connections and reduce performance. Avoid deep discharges by not fully draining the battery regularly, and always use the official charger to maintain balanced charging and prevent overcharging. Following these simple routines can significantly extend the lifespan of both your battery and scooter, ensuring reliable performance and longer-lasting rides.
FAQs
Can I remove the battery alone or should I seek help?
Most users can remove it alone if they follow proper steps, but assistance is helpful for first-timers.
How often should I check the battery?
Check at least once a month or before seasonal storage.
What tools do I need for safe removal and reassembly?
A small screwdriver, threadlock sticks, silicone, and optional adhesive spray are recommended.
Conclusion
Removing and maintaining your Kurikin G2 Master battery is manageable when you know the correct steps. Proper care ensures longer scooter life, safer rides, and avoids costly repairs. By following our guide on battery removal, storage, and troubleshooting, you can confidently maintain your scooter year-round. Proactive maintenance and careful handling are the keys to a reliable and long-lasting electric scooter experience.